| |


Contents
- Introduction
- Contents page
- Questions and assessment
- The question window
- The answer log
- How questions are chosen in Shuffle mode
- Users
- Networking
- Feedback
- Networking
Introduction
SURE Q helps you test your knowledge of a subject by asking you a series of questions and giving you feedback in response to your answers. To begin a set of questions you only need to start up SURE Q, select some topics and click the Go button. If you need to know more then read on.SURE Q keeps a record of all answers that you have entered. If you want to keep this record of answers separate from other peoples' answers then you need to log in with your own username and password. This is described further in the Users section.
Shuffle
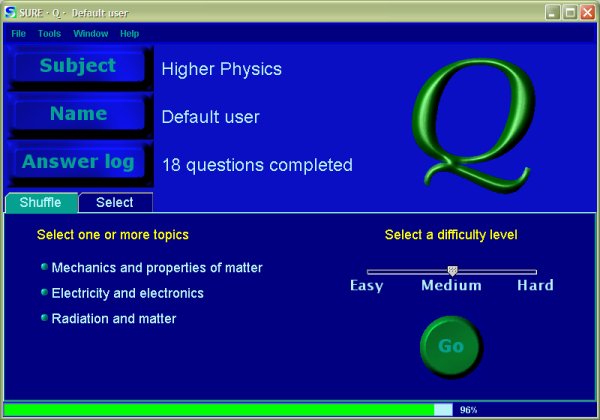
When you start SURE Q it will begin in Shuffle mode:
Select
Select mode allows you to choose questions and build your own question sets. Clicking on the Select tab at the centre left of the window will display the following:
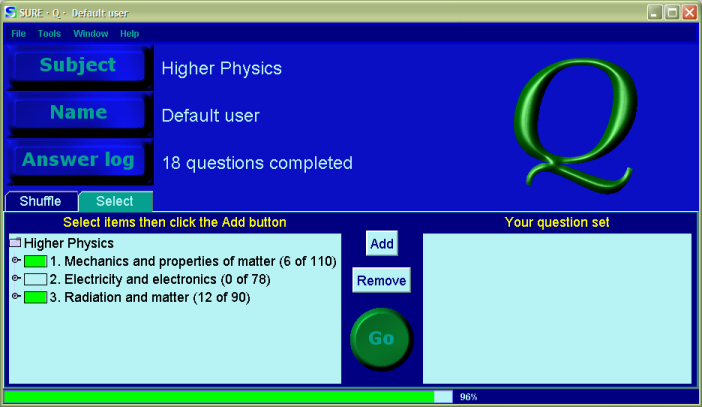
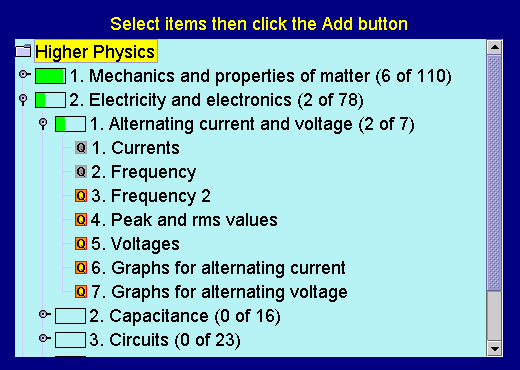
Every topic and sub-topic (we'll refer to both as topics from now on) has a rectangle next to the left of its name. If this rectangle is mostly green, this means that you have been doing very well with the questions in that topic - getting most of them right first time. A half-filled rectangle indicates that, on average, you have answered questions correctly after a couple of attempts. If the rectangle is completely empty, then either you have not attempted any questions in that topic, or you have been taking more than three attempts to answer questions correctly. The numbers in brackets (e.g. 3 of 9) tells you that there are 9 questions in that topic and that you have completed 3 of them. You can see more information on a topic or question by hovering the mouse it for a short time.
You can build up your own question set in the area to the right of the tree. Click once on a topic or question in the tree to select it - it will turn yellow. Then click the Add button and it will appear in the list area. You can select and then add several items at once by holding the ctrl and shift keys down whilst you are clicking on the tree. You can also remove items by selecting items in the list and clicking the remove button - again you can use the ctrl and shift keys whilst clicking to select multiple items for removal.
Once you are happy with your question set you can start it by pressing the Go button.
Questions and assessment
The question window
A typical question window is shown below

The question is displayed at the top of the window and you can enter an answer in the box in the middle. The Attempt number shows the number of attempts you have made on the question so far. The lower space is for displaying feedback in response to your answer.
A question is said to be completed
when either- you have answered correctly
- or you have answered incorrectly three times
Once a question has been completed, the Attempt number box becomes the Show model answer.
You can use the  button to go
to the next question. You can go to previous questions using the
button to go
to the next question. You can go to previous questions using the  button. If you want
to abandon the current question set and return to the contents page then press the
button. If you want
to abandon the current question set and return to the contents page then press the  button.
The progress bar at the bottom of the window shows how you have been doing overall, based on all questions that you have completed. A full green bar means that you have been getting most of your questions correct first time. A short green bar means that you've been getting a lot of questions wrong, often taking more than two attempts to get the correct answer. The progress bar shows you your current score out of the maximum possible score and the percentage that this gives. For example, if it reads 6/9 (67%) then you've got a score of 6 and the most you could have scored had you got all the questions correct is 9.
You can view the Marking scheme, which explains how points are awarded, either from the Help menu or by clicking on the progress bar at the bottom-left of the main window. Marks are awarded and added to the score (see the Assessment section below) if you give the correct answer in one of your first three attempts:
| First attempt | 3 marks |
| Second attempt | 2 marks |
| Third attempt | 1 mark |
| Further attempts | 0 marks |
If you want to see your previous answers to a question click on the  icon
to the right of where you type in your answers. If you click on an old answer then you will see the feedback - but don't worry,
the answer won't be marked again. You can also revisit old answers using the answer log, which is described below.
icon
to the right of where you type in your answers. If you click on an old answer then you will see the feedback - but don't worry,
the answer won't be marked again. You can also revisit old answers using the answer log, which is described below.
Answer log
Information on answers you have given is stored in the Answer log, which can be viewed by the pressing the Answer log button on the contents page. A typical answer log window is shown below:
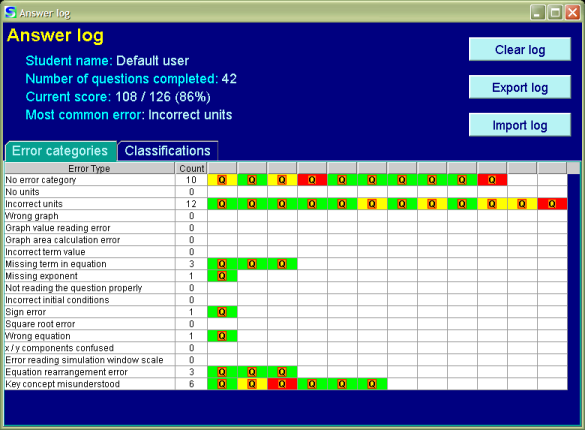
The log gives the number of questions completed, the current score (out of the maximum possible score) and the most common error.
The Clear log button will remove all your stored answers and reset the score and number of completed questions to zero.
The Import log and Export log buttons allow you to transfer your answer log between computers so, for example, you can take your work from your school to your home and continue it as homework. To export a file you need to do the following:
- Make sure you are logged on as the correct user
- Open the answer log
- Click the Export log button
- Select a location and file name where you want to save the answer log
- Click the save button
You can then move the .StudentAnswerLog file (via email or memory stick) to another computer and use the Import log button. The procedure for importing is very similar to the exporting procedure detailed above.
The Error categories tab shows incorrect answers organised by error category. Each question icon in the table represents an incorrect answer entered and the colour indicates the attempt number:
| First attempt | green |
| Second attempt | yellow |
| Third attempt | red |
Clicking on a question icon will bring up the question window containing the answer, its question and the appropriate feedback.
The screenshot below is an example of the Classifications tab - it classifies all the answers given by subject. The tree is similar to the tree used in Select mode but it only contains questions that have been attempted and it also has some extra information on how each question was answered. Double-clicking will take you to that question with the most recently inputted answer.

How questions are chosen in Shuffle mode
The type of question you are asked depends on the topics and the difficulty level that were selected on the contents page. Also, since you will never be asked the same question twice (until you have cleared the answer log), the chosen question will depend on how many questions are left in the software's database.
For example, if you selected topics "Mechanics" and "Properties of Matter" and set the difficulty to "Easy", then the software randomly chooses easier questions from those two topics. Once all the easier questions have been asked, it will start to give you harder ones. Once all the questions have been asked you will be told that there are no questions left for the chosen topics. You can then move onto trying other topics, or clear the log to retry questions from "Mechanics" and "Properties of Matter".
Users
SURE Q keeps a record of all answers that have been entered. If you want to keep this record of answers separate from other peoples' answers then you need to log in with your own username and password. Use the User name item under the File menu to change to a different username. You can create new users by starting the User manager from the Tools menu, though you will need to enter your purchase code to confirm you have permission to edit usernames and passwords. The user manager also allows you to view the answer logs of any individual user or any group of users.When you start SURE Q you will automatically be logged on as the Default user. You can change to another user by clicking on the Name button on the contents screen, which brings up this window:
If you leave the Username blank and press OK then you will be logged on as the Default user.
Note: The purchase name and purchase code will have been assigned by Counting Thoughts when purchasing the software and they nothing to do with User names and passwords for different users.
Networking
Please see the file called network readme on the CD for information on network installation.We are aware that there are many types of network in use and that each one has its own peculiarities. If you have any trouble with network installation,
please email  and we will do our best to help. If necessary we can make
a build of the software tailored to your particular network.
and we will do our best to help. If necessary we can make
a build of the software tailored to your particular network.
Feedback
To provide us with feedback on what you think can be improved in the software please email us at